
Unleashing the Beast: A Guide to True Dual 4K@60Hz Performance on Your Laptop
You’ve assembled the perfect mobile workstation: a high-performance laptop, like a Dell Precision, paired with two brilliant 4K monitors. The stage is set for ultimate productivity. But when you connect everything, you’re met with a frustrating reality—choppy mouse movements, stuttering video, and a system display setting stubbornly locked at 30Hz.
If this scenario feels familiar, rest assured, your powerful graphics card isn’t faulty. The culprit is a clever yet restrictive power-saving design hidden within your laptop’s architecture. This guide will illuminate the issue and walk you through the definitive solution to unlock the silky-smooth, dual 4K@60Hz experience you invested in.
The Core of the Problem: The Integrated Graphics Bottleneck
The limitation stems from a technology known as hybrid graphics (popularized by NVIDIA’s Optimus). To conserve battery life, most laptops route all display signals through the processor’s integrated GPU (iGPU) before they reach the physical ports.
- The Signal’s Indirect Journey: Your powerful discrete GPU (dGPU)—the NVIDIA RTX or AMD Radeon card—does all the heavy lifting for demanding graphics processing. However, instead of sending the final image directly to your external monitors, it first passes the data to the iGPU. The iGPU then acts as a mandatory middleman, outputting the signal to the HDMI and other display ports.
- Why This Limits Performance: While the iGPU is perfectly fine for basic tasks, it lacks the bandwidth and processing power to manage two separate streams of 4K data at a 60Hz refresh rate. Faced with this overwhelming task, it defaults to a lower, more manageable refresh rate: 30Hz. This is the source of your performance bottleneck and the core of HDMI dual screen limitations on many laptops.
Our goal is to bypass this middleman entirely and create a direct highway from your dGPU to your monitors. This is known as dGPU Direct Output Mode.
The Solution: A Three-Step Path to Flawless Performance
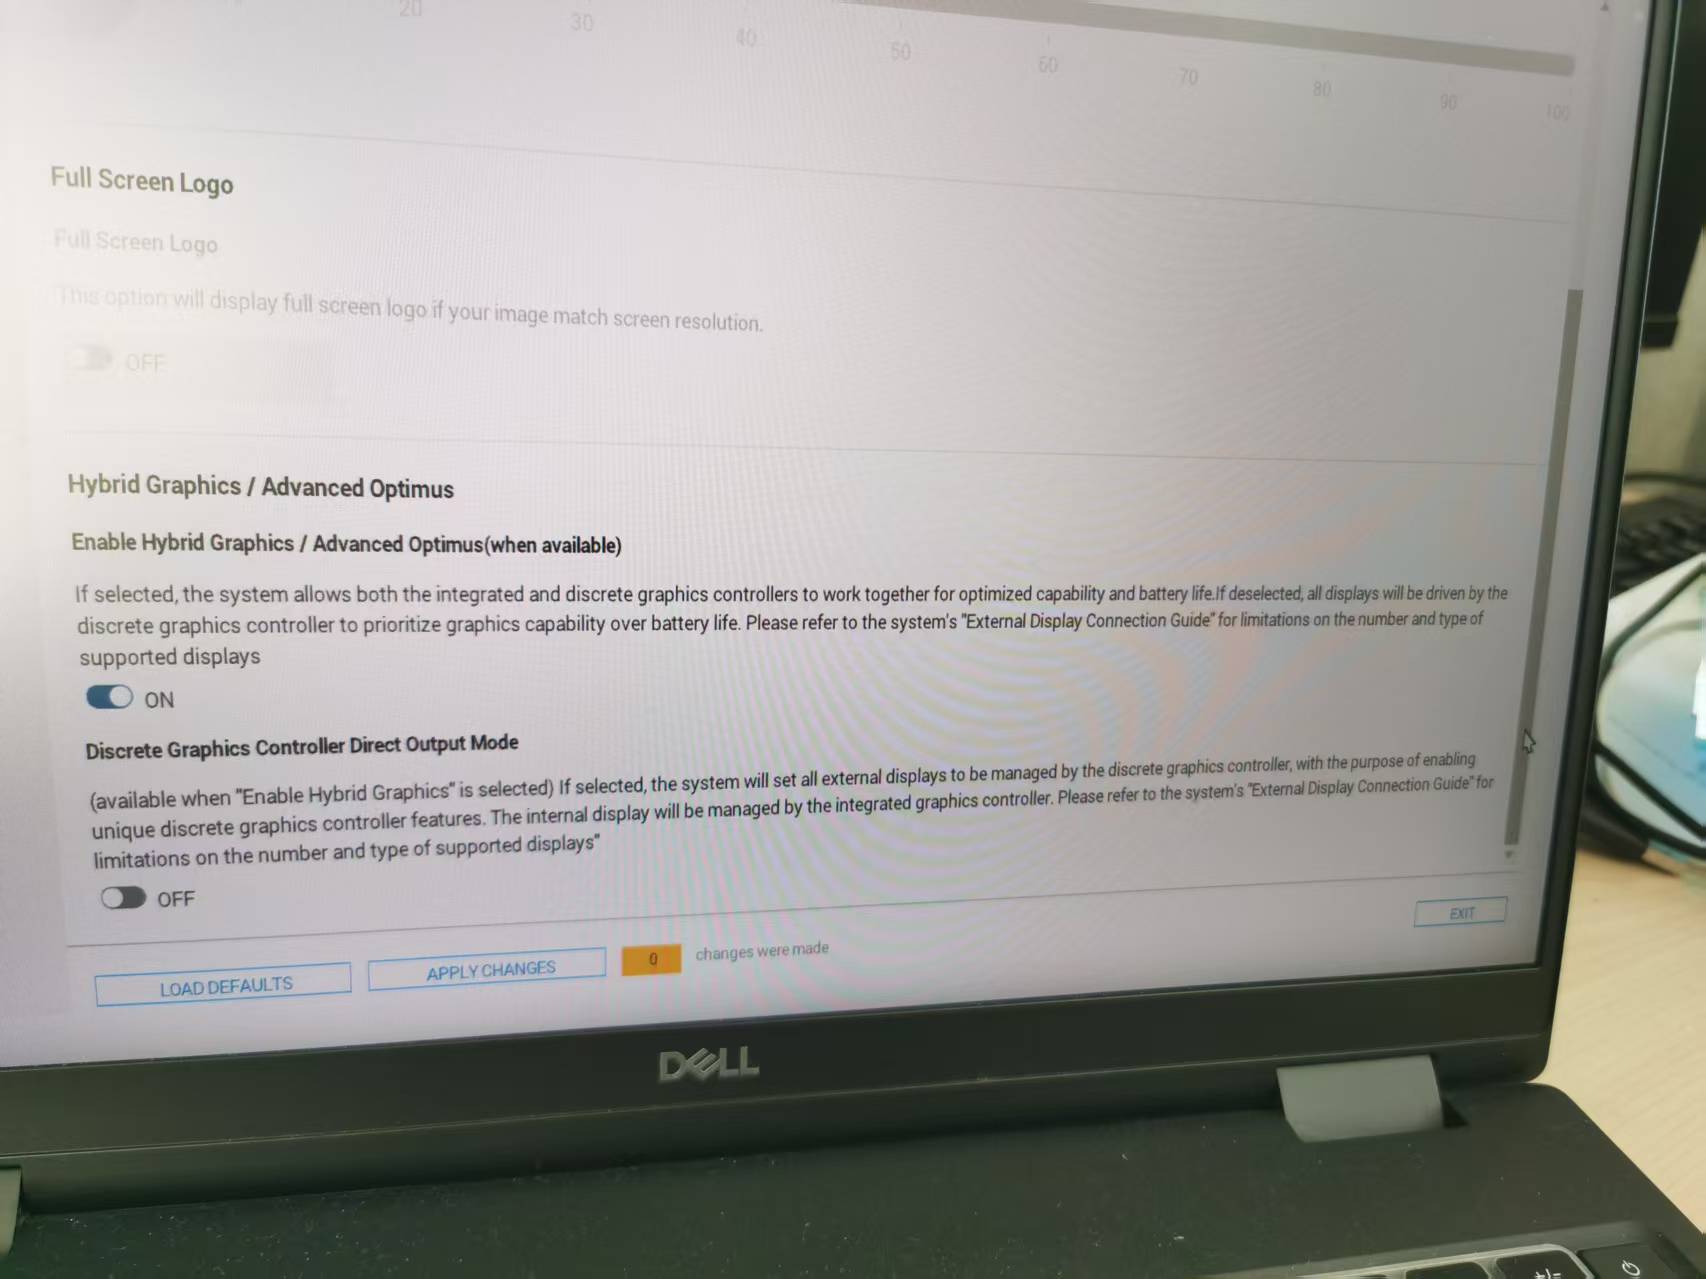
Step 1 (The Game-Changer): Enable Discrete Graphics Mode in Your BIOS/UEFI
Many high-end laptops are equipped with a MUX Switch, a physical hardware switch that allows you to change the display signal’s path. You can activate it in the BIOS.
- Reboot your laptop. As it starts up, press the appropriate key (commonly F2, F12, or Del) to enter the BIOS/UEFI setup.
- Navigate through the menus to find settings related to “Display,” “Graphics Mode,” or “GPU.”
- Look for an option named “Discrete Graphics Controller Direct Output Mode,” “dGPU Only,” or “Ultimate Mode.”
- Change this setting from the default “Hybrid Graphics” or “Optimus” to Enabled or Discrete.
- Save your changes and exit. Your laptop will restart.
A Note on Power: Enabling this mode will significantly boost your graphics performance, but it will also increase power consumption and reduce battery life, as the dGPU will always be active. This mode is ideal for when your laptop is plugged into a power source.
Step 2: Choose the Right Port and a High-Quality Adapter
With the MUX Switch enabled, the next step is to use a port that is physically wired to the dGPU.
- Avoid the Native HDMI Port: On many laptops, the built-in HDMI port remains hardwired to the iGPU, even in discrete mode.
- Embrace USB-C / Thunderbolt: The USB-C port (especially Thunderbolt 3/4 or one supporting DisplayPort 1.4 Alternate Mode) is almost always directly connected to the dGPU. It offers the massive bandwidth required for this task.
Your adapter is just as crucial. Ensure your Type-C to Dual HDMI adapter or docking station explicitly supports:
- MST (Multi-Stream Transport), the technology that allows multiple video streams over a single connection.
- Dual 4K@60Hz Output. Do not settle for adapters that only support 4K@30Hz when two ports are in use.
Step 3: Finalize with Driver and System Settings
- Update Your Graphics Drivers: Always ensure you have the latest drivers for your NVIDIA or AMD graphics card from the manufacturer’s official website.
- Confirm in Windows: Navigate to Settings > System > Display > Advanced display. Select each of your 4K monitors and ensure the Refresh rate is set to 60Hz.
- Check the GPU Control Panel: Open the NVIDIA Control Panel or AMD Software: Adrenalin Edition. Under the “Set up multiple displays” section, verify that both monitors are detected and actively managed by your dGPU.
Conclusion
The frustrating 30Hz limit on your dual 4K monitors is not a flaw but a feature of a power-saving design. By diving into your laptop’s BIOS to enable the MUX switch for dGPU direct output and pairing it with a high-bandwidth Thunderbolt/USB-C port and a capable adapter, you can bypass the iGPU bottleneck entirely. This unlocks the full potential of your graphics card, transforming your workstation into the fluid, high-performance powerhouse it was always meant to be.
Now, go and enjoy the crystal-clear, silky-smooth world of dual 4K@60Hz.
Leave a Reply